Racers
Info for races
Server Rules
Server Rules
Section 1 - The conduct of behavior expected of all community members, both in the discord and on the track.
-
No -isms (racism, sexism, etc). BATL is, and will remain, an inclusive home for casual drivers and racers of all races, nationalities, genders and sexualities.
-
Refrain from discussing politics. This is a driving/racing/gaming Discord specifically, and while casual conversation may occasionally touch on political topics, this is not the place for political debate.
-
All community members are expected to resolve the inevitable conflicts that arise like an adult, without name calling, open hostility or personal attacks. Complaints about race incidents are to be made after the race has concluded and via the #contact-staff channel, not in voice chat during the race.
Section 2 - AC Server and technical rules
-
No blatantly offensive or explicit liveries are to be run, check with track staff if you have any concerns or wish for clarification on a particular livery concept/execution please ask a Steward via #contact-staff.
-
A driver’s displayed name when racing in the BATL AC servers must match/include your Discord name.
-
All drivers must join and monitor the appropriate BATL voice chat channel (usually Pit Lane #1). Drivers do not need to be on mic and may mute themselves, but drivers must be monitoring for instructions or communication from other drivers.
-
Do not share paid mods. The variety of content available to us in AC is due to the effort of mod makers and any mods required for BATL servers will be available for a reasonable cost, please respect their work.
-
Please ensure your ping to the BATL server is under 200 before participation. In most (if not all) cases this is going to require a wired (not-wifi) connection and stable internet connection. Please contact a Track Staff member if you have any questions or would like help testing your connection.
-
Please let the Server Director know in the event you are signed up and registered for an event but will not be able to attend. Drivers who do not appear at races without notice may be dropped from the season.
Section 3 - Racing Rules for BATL races and practices. Violations of Section 3 can be punishable by season points deductions after appropriate Steward review.
-
General
-
All drivers must use either a visual (heliocorsa, car radar, etc) or auditory (pit crew, etc) track radar system to make themselves aware of other cars around them at all times.
-
For BATL regular season races, RealPenalty must be installed and correctly configured.
-
Should a driver leave the track (meaning all four tires leave the allowed track limits), that driver must wait until track re-entry can be made in a safe manner and without requiring other drivers to stray from their line or pace.
-
Drivers entering the track from Pit Lane must respect track limits as specified for the pit lane exit. All four tires must stay within the solid white exit lane.
- Fielding the grid: Should a driver return to pits/jump start, that driver must wait in pit lane until the entire grid on track passes. Re-entry can be made in a safe manner and without requiring other drivers to stray from their line or pace.
-
Passing
-
A defending car may make one move to block the attacking car, subsequent moves will be considered illegal blocking.
-
When passing on the inside of the corner, the attacking car must have its front wheel in front of the defending car's rear tires. The defending car must leave a car's width at the apex.
-
During Qualification laps if you are on an out lap or slow lap, drivers must let other drivers on a flying lap pass cleanly and without impeding the racing line. Conversely, it is up to drivers on a flying lap to communicate that to slower drivers to avoid an impediment to their lap.
-
Blue Flags
-
During the race if a driver is being blue flagged by the same class of car, that driver must stay on the racing line and lift at the first safe opportunity to allow the pass.
-
During the race if a driver is being blue flagged by the higher class of car, that driver must stay on the racing line and drive normally, and it is the responsibility of the faster class car to pass safely.
-
It is the responsibility of faster class cars to pass slower class cars safely. Drivers must be patient and wait for a safe opportunity to pass off the racing line.
-
Reverse Grid
-
Drivers must be patient on reverse grid races. Remember that the drivers starting ahead of you will have earlier and less consistent brake points, may take slower lines through corners, and may brake at corners that can be taken flat out or with a lift of the throttle. It remains the passing driver’s responsibility to avoid rear-end accidents.
-
Busting an Andrew: Should a driver purposely slow down to gain a competitive advantage for the reverse grid during the first race, the driver must teleport to pits and return to track at the back of the grid.
-
Incident Reporting
-
Use contact staff to create a ticket after the race has concluded. Tickets must be submitted within 24hrs of the conclusion of the race.
-
Incident reports must always be accompanied by either an AC replay file or video of the incident. Multiple angles are always preferred
-
Upon the creation of a ticket, the stewards will announce the details of the incident that had been reported. The individual who opened the ticket will remain anonymous.
-
The stewards will investigate the incident and determine if any action is necessary. Upon the conclusion of the investigation, the stewards will announce the findings and the penalty if any. Should one of the Stewards be involved in the incident in question the incident will be reviewed by BATL staff, excluding the involved driver.
-
Investigations will be strictly limited to drivers identified in the ticket and any driver in the chain of events leading to the reported incident.
-
Penalty’s may be protested one time only by the penalized driver by opening a new ticket. A protest must be accompanied by new documentation and explanation of the reasoning of the protest. Valid protests will be reviewed by additional track staff before a final determination is made.
-
Protested decisions are final.
Remember, at the end of the day we are all playing a video game and no one is going to be earning or losing a seat at Mercedes, Ferrari or Red Bull based on their races here at BATL.
We are all here to race clean races, improve our driving skills and have fun with friends, please remember this and treat other drivers with the respect we would like to be shown.
Liveries
BATL Logos
![]()
![]()
![]()
![]()
![]()
Livery Making Guide
MAKING LIVERIES FOR ASSETTO CORSA
All you’ll need to create your own custom liveries is:
Content Manager
https://assettocorsa.club/content-manager.html
GIMP, a free alternative to Photoshop
This guide is meant to get you started, not to explain all the ins and outs of everything GIMP can do. If you have any questions my Discord name is HuckFerrill on the Back at the Lab server.
**First create a folder to save your work, and set it up however you like to organize yourself. A good setup is to have every livery with its own sub-folder to house your work for each car.

**Go to the “cars” menu under the “CONTENT” tab in Content Manager. Here is where you choose the car you wish to create a livery for.

**On the bottom will be two rows of menus for whatever car is showing. The upper left option is “Folder”, click that:

That will bring up all of the car’s files:

Click on the “skins” folder to bring up each livery for that vehicle:

**Copy & paste one of the folders for your livery.
Make sure to give the new folder a different name.
**Because you’re copying a folder, there will be an identical icon for your car under the CM “cars” menu matching the original, so don’t get confused. There will also be an identical livery photo.
**To avoid any confusion the next move is to open your new copied skin folder. Ignore everything in the folder for now and look for this Notepad icon:
NOTE: not every car skin folder will have this Notepad, or some other things for that matter, because not every skin folder is universal. If you choose a car without one you can copy one from a different car.
**Open the Notepad and it will look something like this:
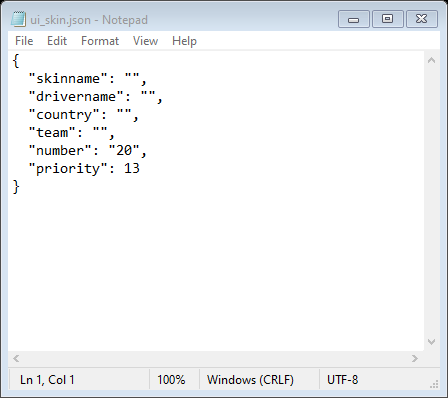
This corresponds with the info you see when hovering your cursor over a car icon in CM:

Enter what you want between the quotation marks and save it. This will help you know you’re on the right car until you can change the livery icon. Close the livery folder for now.
**Back in the “cars” menu in CM, make sure your new car is selected and select “CM Showroom” listed in the bottom icons:

This will bring up a fully moveable 3D view of the vehicle. Left click and hold to move the car in any direction and use the mouse wheel to zoom in and out.
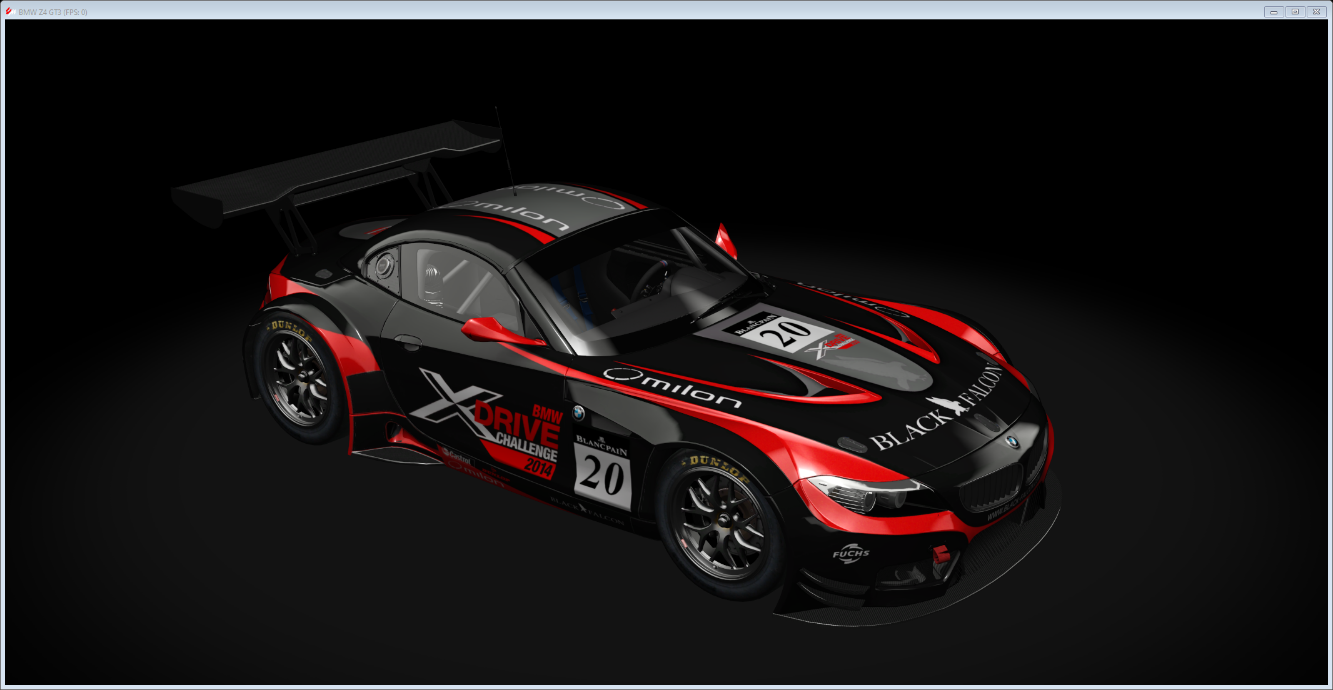
Here is where you will find all the skins for a vehicle just by left clicking anywhere on the car. When I left click on the door, for instance, an outline will form around it like so:

When clicking elsewhere you’ll find the same thing will happen; the car will be sectioned off. This doesn’t mean these are all separate skins though; the door shares a skin with much of the rest of the vehicle.
To get the skin you’ll need the menu that pops up when you open “CM Showroom”:
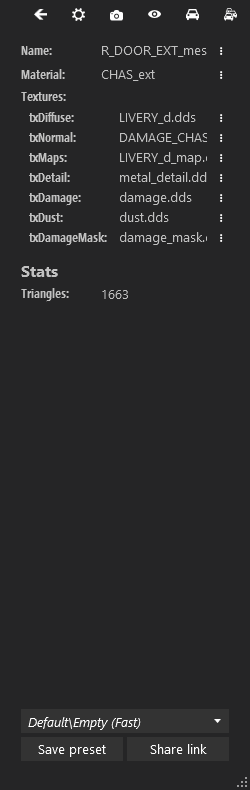
While the door is highlighted you can find the skin name under “Textures:” called “txDiffuse:”
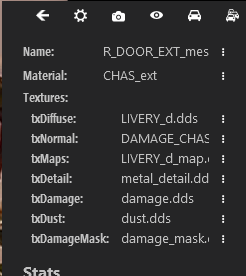
LIVERY_d.dds is the name of the skin the door is on. When you click on the hood, fenders, etc. you will probably see the same skin name. Some cars do have multiple skins for the same vehicle; just check the name.
NOTE: never change the name of the files or else they will not work.
Click on this next to the skin name:
That will bring up the “Car texture”
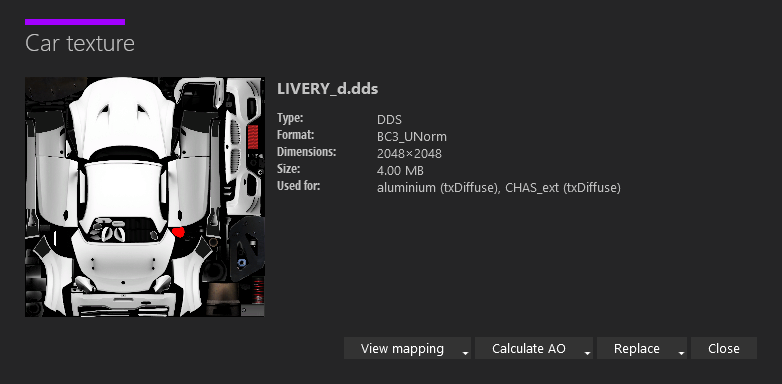
This is the skin the door is on. As you can see it’s close to being the entire car.
*Click on the drop-down menu under “Calculate AO”. This shows you the resolution options for the skin. Click the desired option to generate a blank copy of the skin.
*A full screen view will appear. Click on the screen; in the lower right you’ll see a floppy disk save icon. Click that and the official car folder will appear. DO NOT SAVE IT THERE. Save it to the folder you made in the beginning where you will store your work.
*Save one copy as a dds file, then save again, this time as a png file. You should now have the skin saved twice: one dds copy and one png copy.
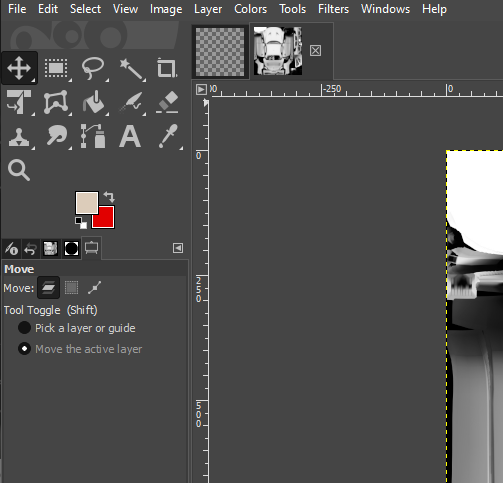
*Go into the car folder and right click on the dds file, select “Open with” so that you can choose GIMP to open it. Do the same with the png copy.
*When loading a dds file into GIMP you will get this menu:

Deselect “Load mipmaps” and select ok.
This is how GIMP will look with each file opened:
![[LIVERY_d] (imported)-1.0 (RGB color 8-bit gamma integer, GIMP built-in sRGB, 1 layer) 2048x2048 – GIMP](https://lh3.googleusercontent.com/aZ2RE0B054X5Kymr7W9QKAdfUFoXkEgXVg4axrbGemqhq0GC6iyuAkFj0fQPxWCcy-NbxND-GctZpTswrQv1_ktv5a1kg_rXUQAeLmuMdJIGy-js5QTzHQ7REyxWultNfvya_Rbm1I8RUv2goFAXJA)
The dds will have a gray checkerboard look to it.
The png copy should look like this:
![[LIVERY_d] (imported)-2.0 (Indexed color 8-bit gamma integer, GIMP built-in sRGB, 1 layer) 2048x2048 – GIMP](https://lh5.googleusercontent.com/R5AnrvAarvcMuJMcOTW6TqMl85BZC9H5dtB8MYbQjxqwz7e9RLQes0zknLCcrq4GaZYmnmJE9LQkuBBFtvueKgj4HzSpMX2MzGLHMb8r5uAH6eXtgwmr3pEfj-uESW45WhUdxhvK0VfSuhxsCcW5MQ)
*Before going further, a quick rundown of GIMP*
On the left side are all the controls and commands. They can be selected by icons or a toolbar.
On the right are filters at the top and the layers on the bottom

Putting your cursor over each icon (or right clicking the icon) will give a brief description of what it is and tell you what the hot keys are:
You’ll have to experiment with them as I’m not going through each one, just the few I’m familiar with. This guide is just to get you up and running; the rest is your imagination.
**HOT KEYS I USE MOST FREQUENTLY**
Ctrl C = copy
Ctrl V = paste
Shift T = transform (resize images)
Shift R = rotate
Shift F = flip horizontally (hold ctrl to flip vertically)
Ctrl E = export
Ctrl + mouse wheel = zoom
After opening your two files in GIMP they will be separate, as shown with the icons along the top middle:

We’re going to layer them together. Click on the png copy and select Ctrl C to copy it. This should show for a moment at the bottom middle:

Move over to the dds copy. Select Ctrl V to paste and it should paste the png copy as a new layer showing in the lower right like this:

It starts as a “Floating Selection.” To make it official just click the Create New Layer option below it. (Hover your cursor over each command to see what they do.)

The result should look like this:

This is how layering works: the png copy will completely cover the dds because it’s on top. Everything you throw in here from now on will work this way: wherever a layer lies on the list it covers all the layers below it.
At this point think of what you see here as the buns of a hamburger, with the png skin as the top bun and the dds as the bottom bun. All of the colors and numbers, decals, icons, etc. you put on the car must be in the middle of these two livery files or else it won’t work.
*Make sure the livery png layer is selected and look just above it to find “Mode” with a dropdown menu to the right:
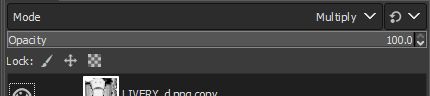
There’s a whole lot of options; ignore them all for now and just select “Multiply”. Mess with the other options later as you learn.
“Mode” allows you to change a png to be transparent in various ways so that it doesn’t completely cover the dds.
**Next select the Create New Layer icon again to create a blank layer:

This will appear:
This new layer will serve as the base color for your car. Give it any name you wish and select ok. No need to change anything else. The rest are advanced options you’ll learn as you go.
The layers should now look like this:

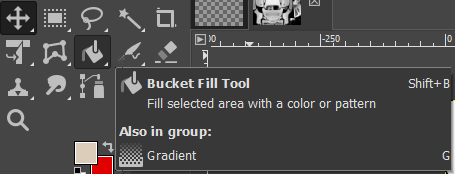
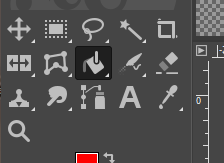
Left click and hold to move the Base Color layer between the livery layers. With the Base Color layer still selected hit Shift B for Bucket Tool, or choose it by the icon:
This command allows you to completely fill a layer with a color.
Just below the icon you’ll see two color boxes:

This is the foreground and background color controls. Click on the foreground color.
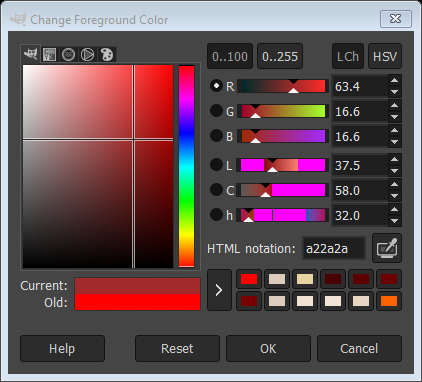
The change foreground color option has several ways to generate colors. This one is the easiest for finding a point-and-click color. When done go back to the bucket tool and make sure you’re still on the color layer. Click once on the skin and it should fully color it, making it appear:
![*[LIVERY_d] (imported)-1.0 (RGB color 8-bit gamma integer, GIMP built-in sRGB, 3 layers) 2048x2048 – GIMP](https://lh4.googleusercontent.com/fsXy5CWGUbOnF0RXuxRZIONRdy-N23KWEoLcChifvs_aWy8Uug7Wxf0hIDuyHFC_asFU0XixIKMM0wq3v1iCW_Ru6TRlUqVRfbcRmzAk5wqb6cn216uToZlBZBx1XGSkqyWIi0v_r8K8Ic0EWQhx1A)
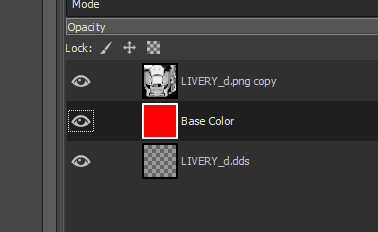
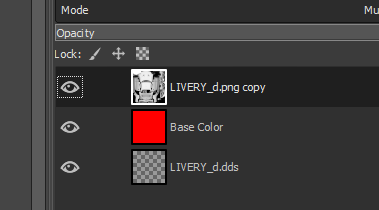
**These three layers are the template for every car: png skin on top, color in middle, dds on bottom.
NOTE: after the base color of the car is placed don’t put anything below the base color. All future colors, pics, numbers, etc. go between the base color and top skin png.
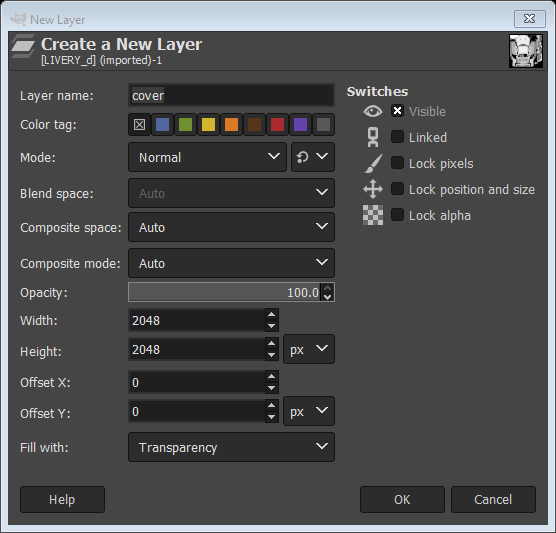
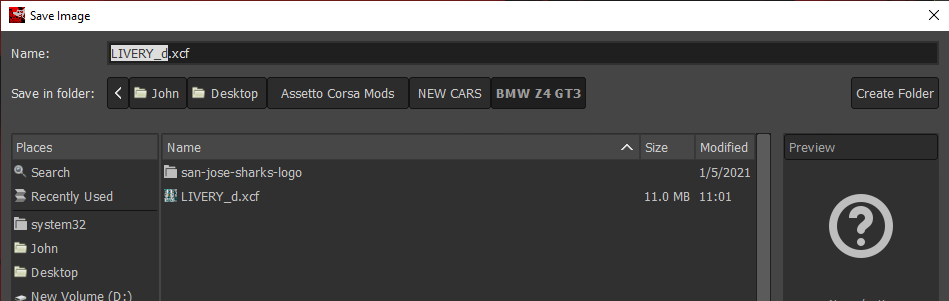
**At this point it’s time to save your work for future changes. To do this go to “File” in the toolbar and select “Save As…”. Save it to the folder you created, not the actual skin folder. When you save it will save as .xcf, which is the GIMP format:
**Now it’s time to export your car into the CM Showroom to see how it looks. For now it’s just a single color; here’s where CM comes in handy to quickly check your progress.
Click on the top png skin to highlight it:
Look for “Layer” on the top toolbar; under Layer select “New from Visible”:
That will create a layer with everything below it squished together into that one layer. This is why you select the top layer first before doing this; it only selects the layers below the one you’ve selected.
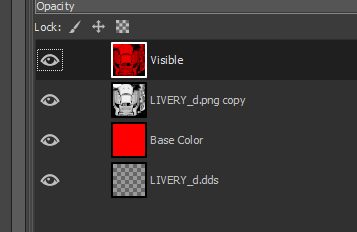
While the new layer named “Visible” is highlighted hit Ctrl E for the Export command. This sends that one layer to the skin folder.

Follow this path to the car folders:
\SteamLibrary\steamapps\common\assettocorsa\content\cars\
You’ll have this memorized in no time.
Find your car and drop it into the corresponding skins folder. Go under “Select File Type” and switch it to dds if it’s in png format.
After you do this once you won’t have to do it again as long as you stay in the same session. When you make more updates and do Ctrl E again it will export immediately.
If you leave the CM Showroom open you can see the car change in real time; there’s no need to close it and reopen.
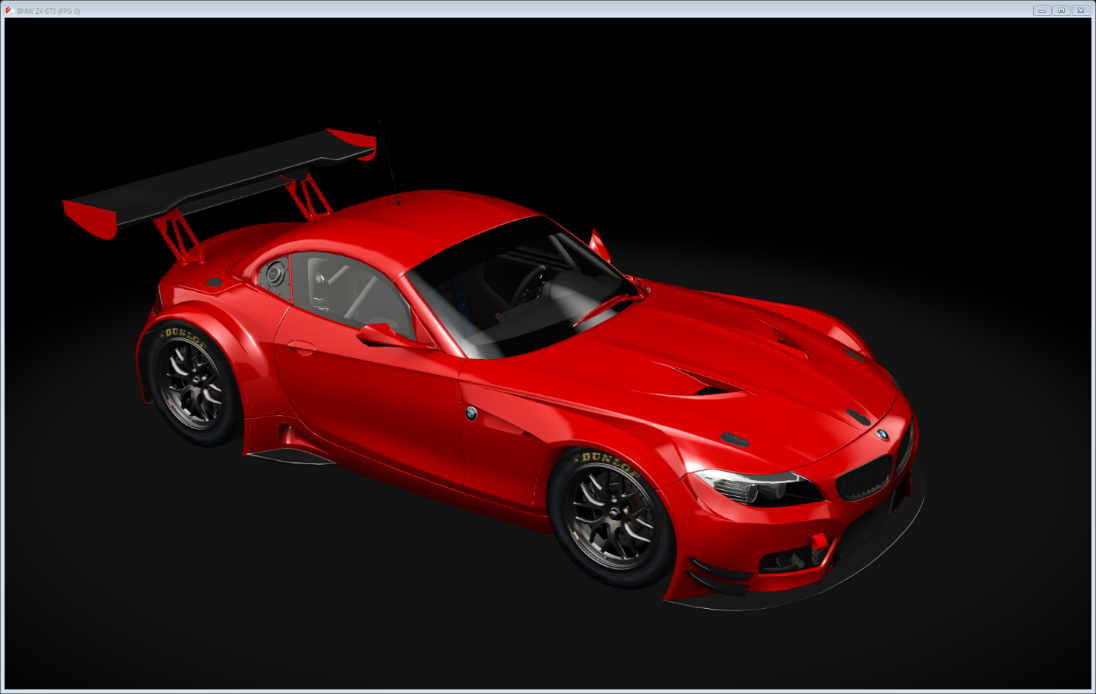
Here’s the existing skin in my copied folder. No changes have been made so it’s just the same car:
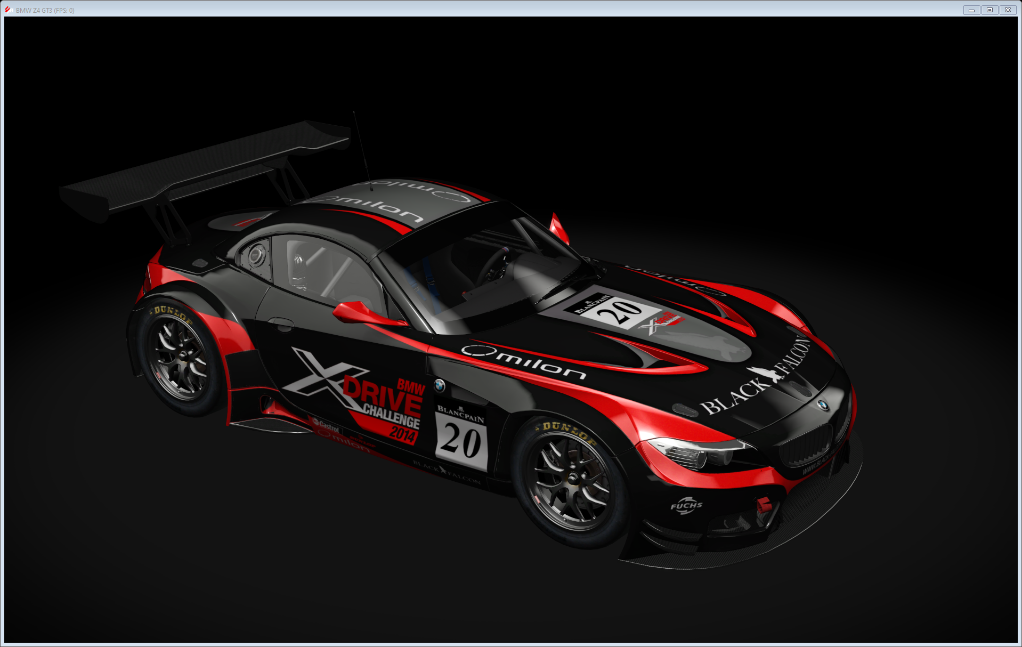
When I export my base setup I should just see a plain red car.
After hitting Export you’ll get this:
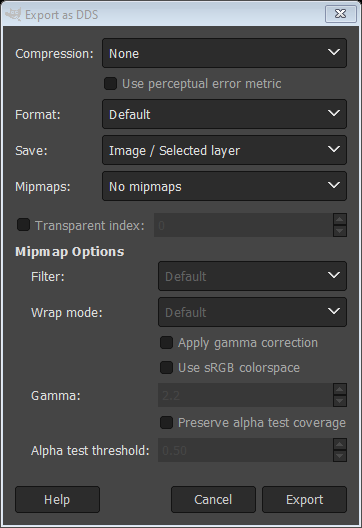
Under the “Compression” drop down menu select one of the first three options; all are fine. I usually select BC3/DXT5. Click Export. When I go back to CM Showroom the car now looks like this. Success!
**From this point on everything is how you want the car to look. Always create a new blank layer before you mess around with the GIMP commands; that way you can just delete the layer if you mess up.
*ATTENTION: make sure you delete the top layer named “Visible” after you do the export. This layer will block the view of all your future changes, and this is guaranteed to make any new user confused as to what the cause is. Every time you want to see changes in the showroom view you will need to generate a new “Visible” layer to export. After setting the path to export the first time you will not need to do it again, as long as you stay in that GIMP session.
**ADDING DECALS**
*To add an image just open a png you want on the car with GIMP, just like you did with the other layers. Copy the image and paste it onto your livery. This whole process works just like the initial setup.
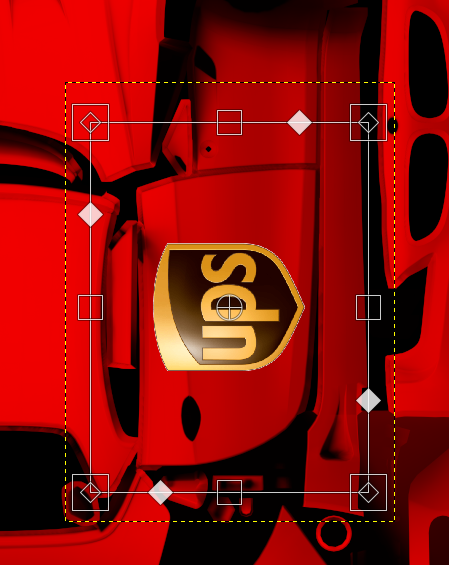
Transparent png’s are the best to work with; they have an image with no background to block the layers below it. I find it works best to Google an image with “transparent png” to find what you want. It’s very easy to find company logos and other name brands. Here’s an example:
![[58429187a6515b1e0ad75ac8] (imported)-6.0 (Indexed color 8-bit gamma integer, GIMP built-in sRGB, 1 layer) 880x660 – GIMP](https://lh5.googleusercontent.com/24PxVorZCW5d5BJMcsKW4yexWjRv8fLEqcSmZJnWN8pBGEcRpjK1a4v-MNZxS-gOL_2MWAA8GUU0ITcGB73uoWnXsooK7qmWG41yKLACDAKA_S8S2oAXvmGSN1O38mpKMEkggqCK4TNnvAa9yxoAYQ)
After copying the UPS logo I paste it into the livery. It will show up wherever you last highlighted a layer. Remember to hit the Create New Layer option to get it out of “Floating Selection” status:

This is the correct position for the logo layer: in between the top livery png and the base color. The logo will blend into the car wherever you position it.
![*[LIVERY_d] (imported)-3.0 (RGB color 8-bit gamma integer, GIMP built-in sRGB, 4 layers) 2048x2048 – GIMP](https://lh4.googleusercontent.com/eB8Ctw23bk0ragvdynxOSzR7jTJp3eDXxABQqRGH1u5GrS3V6CyKnccHjMhPRIxTCCmhVotjP8-EZcfBWrxZIcna2n184K3HFCjRb9hPjeaAs9L_hnoki03WEpZOIDmX4JpKyW9LZEUD9cNs5MuQ_A)
**All images will lose resolution as you manipulate them. It works best to use the rotate or flip tool before resizing an image. Once you make something very small and accept the changes, you cannot go back and make it bigger without it being blurry. If I’m using this UPS logo on both sides of the car, I will just paste another original copy of it onto the livery and not copy the first one I made small. Copying the smaller one just makes the copy even more blurry.
*ROTATE TOOL:
Shift R to rotate. When the logo is selected to rotate it will look like this:
![*[LIVERY_d] (imported)-3.0 (RGB color 8-bit gamma integer, GIMP built-in sRGB, 4 layers) 2048x2048 – GIMP](https://lh6.googleusercontent.com/3mj3XX7moEfUvYiEl1BHk1QOm78npJL8UBTB0FyUZdMFbcrGzfKVtBW7H3OOoFSdgOyFXGf6sY7m22D3eTHAz3863ia6YQVLiVzzSKvcuIRPHfRX2zOk9c0ajDjQTcolHqXNNeokG1lHA5iVYV-vug)
Unfortunately it will temporarily disappear to just an outline of the whole png, which is a pain but unavoidable. The commands are to the upper right:

I only use the “Angle” option. Entering a positive number will turn it clockwise, and a negative number will turn it counterclockwise. For example, entering “-90” will turn it counterclockwise by 90 degrees.
![*[LIVERY_d] (imported)-3.0 (RGB color 8-bit gamma integer, GIMP built-in sRGB, 4 layers) 2048x2048 – GIMP](https://lh3.googleusercontent.com/ZSJGSynPzG-6AFzN4pS3XKBEHAu9r7jE8m1DLee742a2fqRrfTNaR5xP1dBUT3JakyUYk93sBDBdSDvv1sZzILhwlOVCvE0XHeBbsH6scadJN1P4OS_8nQGO7kGgWN9tvt-ocR3a633Qqf5xSR2Scw)
Using the up/down arrows will move it incrementally.
*TRANSFORM TOOL:
Shift T will enable the ability to resize an image. When selected the png will look like this:

If you left click and grab the boxes on the sides you can make it bigger or smaller. When grabbing the corner boxes it will warp. Hit enter when you reach the desired size.
After placing the image you can set up the “Visible” layer again for export to see the changes:

FLIP TOOL:
Shift F to flip an image/layer. Better for images with no letters or numbers. When selected a horizontal two-way arrow will appear. Left click to flip back and forth horizontally. Hold the Ctrl key and left click to change vertically.
COLOR PICKER TOOL: use to match colors over different layers and other open skins. Click on a color and it will show as the foreground color.
FUZZY SELECT TOOL: hit and miss feature that allows you to click on an image and it will draw borders around everything in that color.
*COMMON SKIN FOLDER CONTENTS*
Most skins folders have common files in them you can update to your liking:
As mentioned earlier, this is the Notepad file for what appears in CM.
Livery.png is the small CM icon. I make a new png with the same dimensions (usually 64x64) so that it fits into CM correctly.

Preview.png is the CM picture of your car. To generate a preview for your car only, select the drop-down arrow from “Update Previews”, then options. This allows you to make several updates to your car preview. Selecting “Update Previews” will generate the same pic for all the cars, including yours.

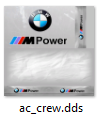
Ac_crew.dds is the logos and color of your pit crew. Under the pinned section of the liveries page on the BATL Discord you can find a template to create one for any car.
*VARIOUS TIPS*
Other skins may exist for the car you’re working on. When clicking on the lower front black part of my red BMW I get this other skin:
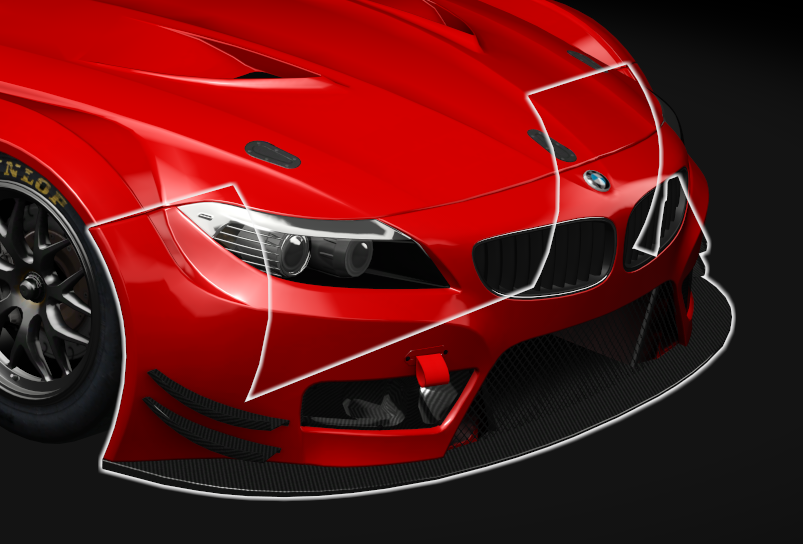
These other skins have varying degrees of useability. This front black part looks like this with the base template setup:
![*[Multimap_generic_white] (imported)-4.0 (RGB color 8-bit gamma integer, GIMP built-in sRGB, 3 layers) 2048x2048 – GIMP](https://lh3.googleusercontent.com/fUeGbOk4SNdMyx5vOSxVv8uRtUx6j7XmKm7F_BfWM-73_i5nLxKvsj9FHVzVHBdz9BF1NOLX6Sr1oBMthtVAq8SneAsZ-E_vLp138G_t8egCdJJ12VhwTVi2cs7kk4GUdPiQI_J-koqgo9KWjlKV-Q)
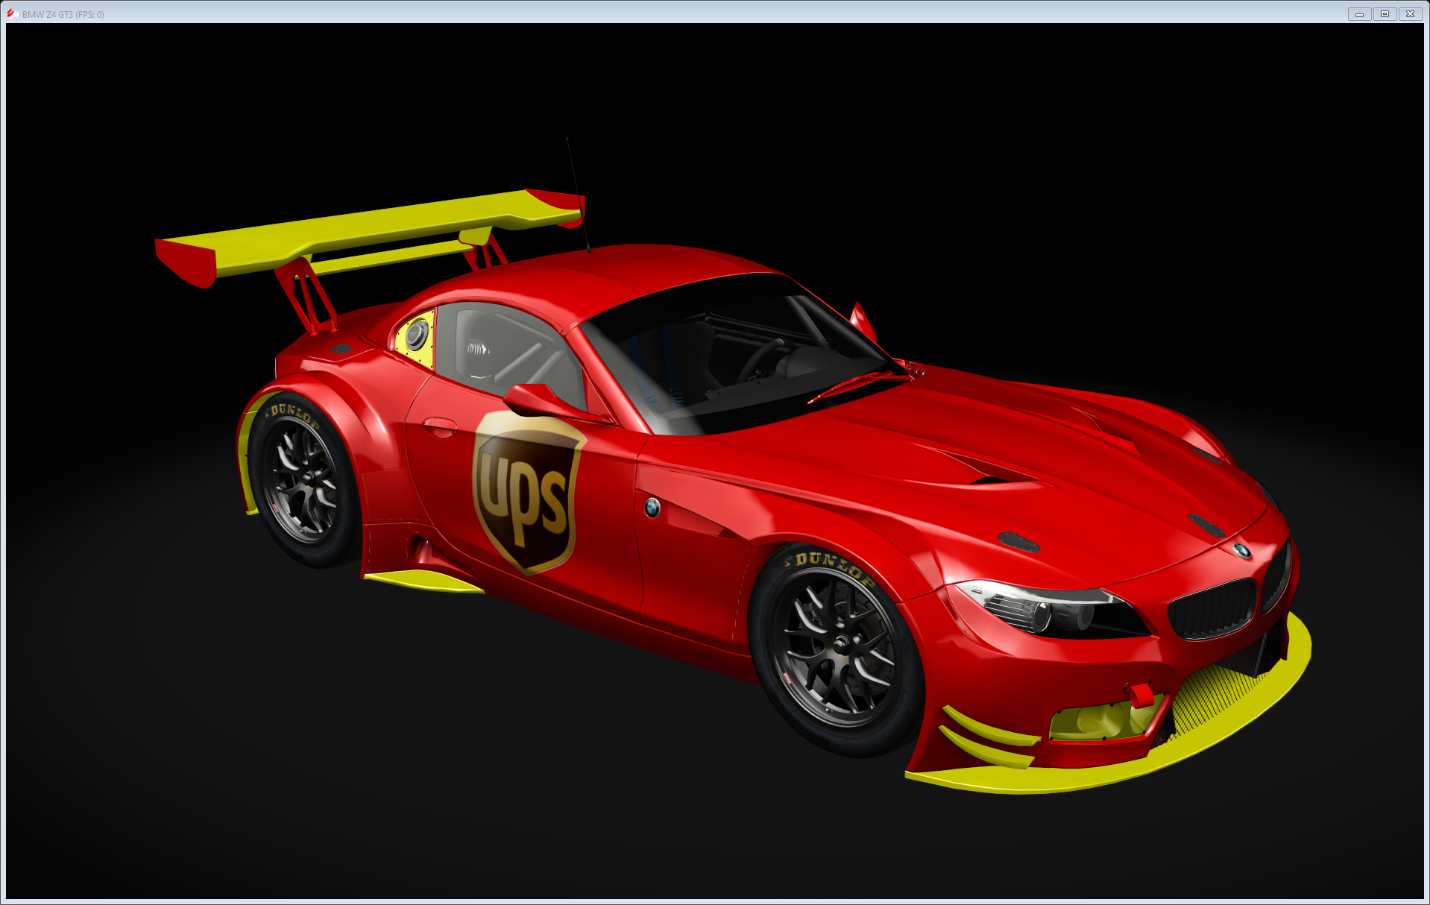
This skin comes out only as a solid color, but at least the color can be changed. When exported to the skins folder the car now looks like this:
As you can see this skin covers more than the front. Anytime you find a different skin go ahead and do the “Calculate AO” to see what it looks like to decide if it’s worth it. The only issue here is the coloring eliminates the metallic look, so keep this mind when making changes to other skins.
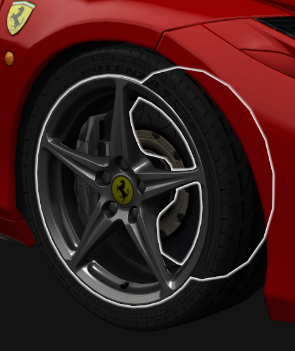
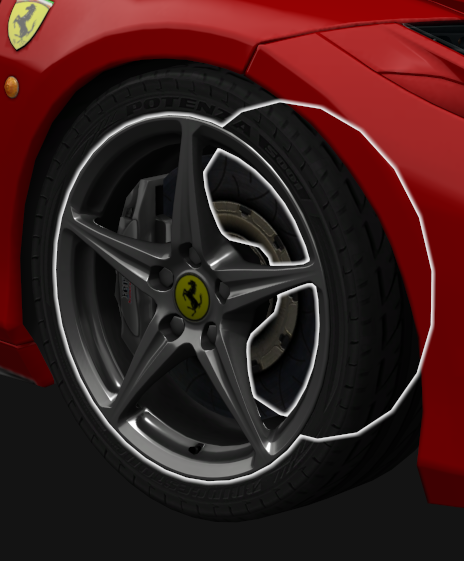
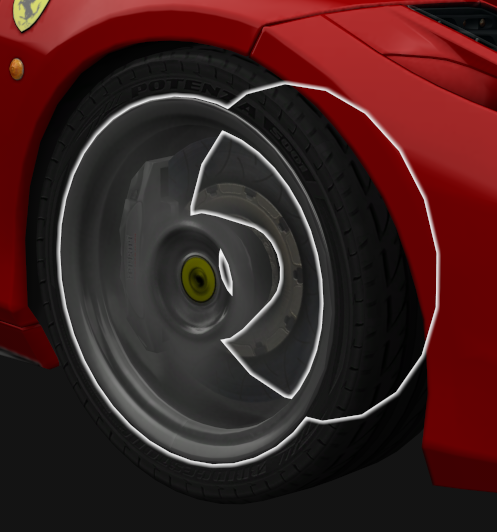
RIMS:
The rims are one of the best options for other skins to color, but you’ll need two different ones to make it work: the regular rim dds & the “blur” dds. Without the blur dds the rim will show the default color when your car is in motion.
First, click on the rim and go through the regular process of creating it with the sandwich method.
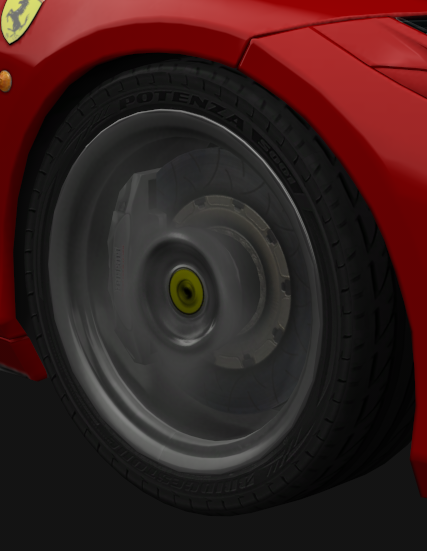
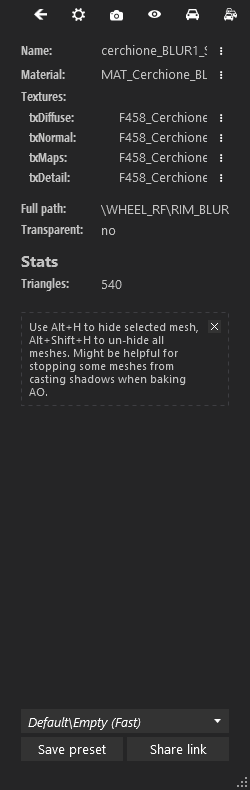
After finishing the rim dds, go over to the CM Showroom menu. Click on the top menu named “Car Params”, then check the box named “Blurred rims”:
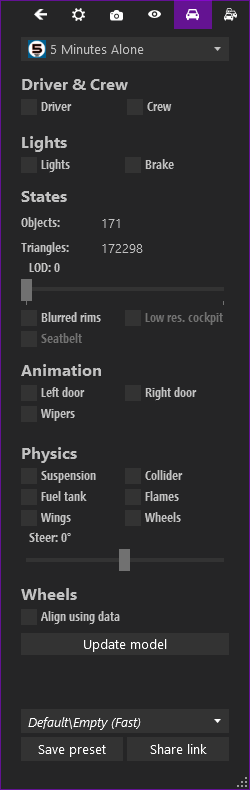
Now your rims will show as blurred in the CM Showroom:
After activating the blur box you’ll first need to click the back arrow on the CM showroom menu so you can click on the blurred rim to update the skin.
IDENTIFY PARTS OF COMPLEX SKINS:
Some skins have stuff all over them, and in a haphazard way, which can make it difficult to figure out what you’re looking at. There is a quick and easy way to identify a specific part of a skin. First create a new layer:

When looking at the car skin I may think to myself, what is this?
Use either the Rectangle Select Tool or the Free Select Tool while on your new layer and select that area:
Now use the Bucket Fill Tool with a contrasting color, like this:
When an area is selected on your layer it will only color that area. Now you can export and see where that stuff is:

Ah ha, it’s the door handles and some trim areas!

FOR BATL DISCORD MEMBERS:
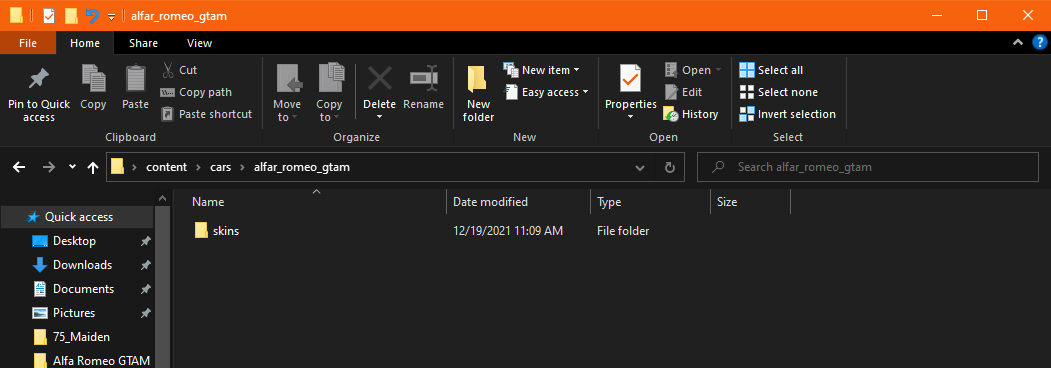
When you have completed your skin there are steps you’ll need to take to send it to us. First create a new folder somewhere named “content”. This folder will mimic the path to the skin folder (SteamLibrary/steamapps/common/assettocorsa/content/cars/****). Make empty sub-folders until you get to your car folder:
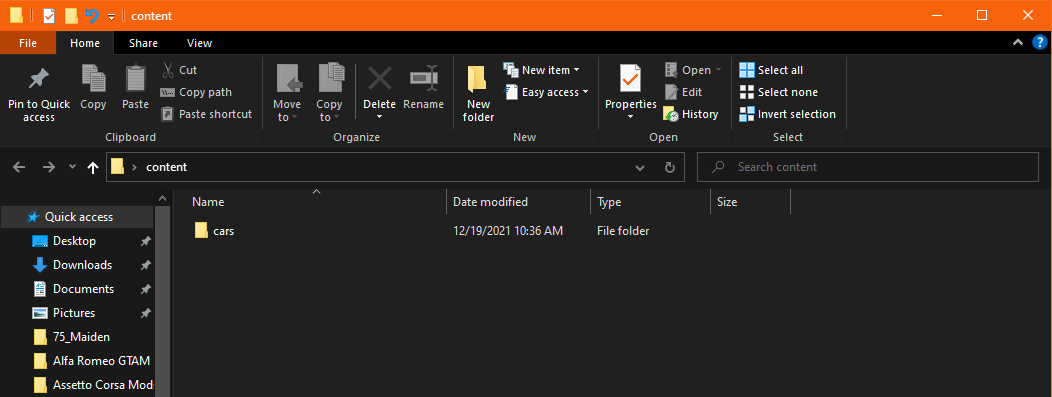

Place a copy of your skin folder into the empty car skins folder. Send the “content” folder over to Oleg so he can add it to the server. When added you’ll be able to sign up for seasonal events with your skin.
That’s it for the basics. If you have any questions reach out to HuckFerrill on the Back at the Lab Discord! If I’m not around there are other folks who can help: SkipJenkins, MINMAX, or Oleg.
Versions-
1.1: added language about how to update your CM preview picture by itself, without changing every picture. Added language about how to send completed skins to Oleg.
1.2: added “Rims” section under **Various Tips**. Shout out to Howitzer for the tip.
1.3: changed language about AC_crew.dds as we now have a template available for use.
Links
http://gtswiki.gt-beginners.net/decal/?searchword=pattern+design&lang=us&type=0&noid=1
Server Links
AC Server:
Discord:
https://discord.batlracing.com
YouTube:
Twitch: